1Getting started
The OtoWash Worker app is how you receive and handle car-wash jobs for your shop. You don't sign yourself up — your shop owner creates your worker account and gives you the login details.
Get the app
Install the OtoWash Worker app on your phone from the Google Play Store or Apple App Store, then open it.
Log in with the details your shop owner gives you
Your shop owner creates your account and shares your login — your email and a password. Type them on the login screen and tap Log in. If your phone offers fingerprint or Face ID sign-in, you can turn that on later to log in faster.
You're in
You'll land on your home screen. From here you go online, see today's work, open jobs, do the work, and check your earnings.
Forgot your password? Reset it with a code
If you can't remember your password, you can reset it yourself from the login screen — you'll get a one-time code (OTP) to prove it's you.
Tap "Forgot password"
On the login screen, tap Forgot password. Enter the email your account uses and ask for a reset code.
Enter the 6-digit code
Check your email for a 6-digit code and type it into the six boxes on the verification screen. If it doesn't arrive, wait for the Resend timer (about a minute) and tap Resend to get a new one.
Set a new password
Choose a new password, type it again to confirm, and save. Then log in with your new password.
Your first time in
Take the quick welcome tour
The first time you open the app, a short welcome tour points out the main parts — going online, your jobs, and your earnings. Read it through once; it only shows on your first run.
2Go online to receive jobs
You only get assigned work while you're Online. The availability toggle sits at the top of your home screen — set it to Online when you start your shift and Offline when you're done.
Switch yourself Online
Tap the Online / Offline toggle on the home screen. When it reads Online, your shop can assign jobs to you and new requests reach your jobs list. When it reads Offline, no new work comes in.
Go Offline when you finish
At the end of your shift, switch the toggle to Offline so you stop receiving new work. Jobs you've already accepted stay on your list.
Stay connected
Keep an internet connection and notifications turned on so a new request reaches you the moment it comes in. If the toggle doesn't flip, check your signal and try again.
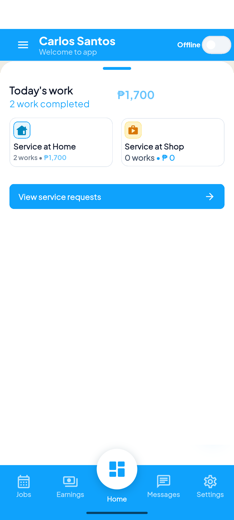
3Your home screen
The home screen gives you a quick snapshot of your day — a greeting, your availability, today's work, and how it splits between home and shop jobs.
Today's work
This shows how many jobs you've handled today and your earnings so far. It's a running total that updates as you finish work.
Service at Home vs. Service at Shop
Two cards split your work by where it happens. Service at Home covers off-site jobs where you travel to the customer's address. Service at Shop covers jobs done at your shop's location. Each card shows the count and amount for that type.
View service requests
Tap View service requests to open your full jobs list and see everything that's upcoming, completed, or cancelled.
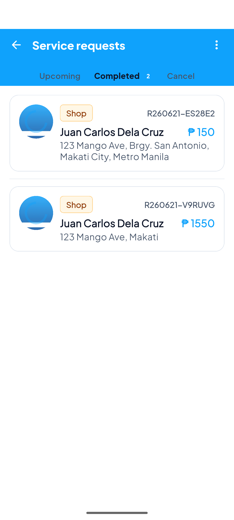
4Your jobs
The service requests list is where all your work lives. Tabs across the top sort it so you always know what's next and what's done.
Switch between tabs
Use the tabs to filter your jobs:
- Upcoming — work that's coming up or in progress.
- Completed — jobs you've already finished.
- Cancel — requests that were cancelled.
Each job card shows the customer, a reference number, the amount, and the address.
Open a job
Tap any card to open its full Booking Details, where you can read the vehicle, booking, and service information and start working.
Accept or reject a new request
When a new request arrives, open it, review the details, then choose Accept to add it to your upcoming work, or Reject if you can't take it (you'll be asked to confirm). Accept promptly so the customer isn't kept waiting.
Refresh to get the latest
Pull down on the list to refresh and pull in any new requests or status changes. New work also appears on its own while you're Online.
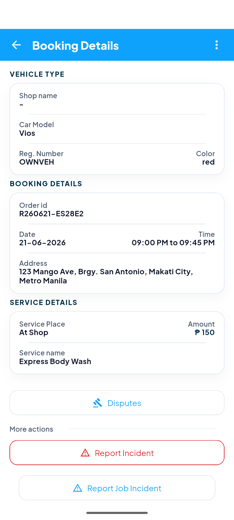
5Doing a job, step by step
Opening a job shows you everything you need before you lift a sponge: the vehicle, the booking, and the service. Then you mark your progress as you go, and — for jobs at the customer's place — navigate and call right from the screen.
Read the booking details
The job page leads with the facts of the job:
- Vehicle — shop name, car model, registration number, and colour.
- Booking details — order id, date, time, and address.
- Service details — service place (At Shop or At Home), amount, and the service name.
Tap Start when you begin
When you actually start working on the vehicle, tap Start. This tells the customer and your shop the wash is underway. If the job needs a "before" photo first, the app will ask you to capture it before it lets you start (see Vehicle intake).
Tap Complete when you finish
Once the car is done, tap Complete. Completing the job is what records it toward your day's work and your earnings. If the job needs an "after" photo, the app will ask for it before it lets you complete.
For home / off-site jobs: get there and stay in touch
On jobs where you travel to the customer, use Directions to navigate to the address in your maps app, and Call (or the job's group chat from Messages) to reach the customer if you need to confirm the location or let them know you've arrived.
Here's how a job moves from start to finish:
| Status | What it means | What you do |
|---|---|---|
| Pending | A new request waiting for your answer. | Open it, then Accept or Reject. |
| Upcoming | Accepted and assigned to you, waiting to be started. | Travel if needed, then tap Start. |
| Started | You've begun the wash — work is in progress. | Do the work, then tap Complete. |
| Completed | The wash is done and the job counts toward today's work and your earnings. | Nothing more — it's finished. |
| Cancelled | The request was cancelled and no longer needs work. | No action needed. |
6Vehicle intake & condition report
Some jobs ask you to record the vehicle's condition before you start, so there's a clear, fair record of how the car looked. This appears only on jobs that require it — if you don't see Start / Continue Vehicle Intake on the job, that job doesn't need it.
The intake screen has three tabs — Photos, Damage, and Review — and you work through them in order.
Open the intake from the job
On the job page, tap Start / Continue Vehicle Intake.
Photos: capture the required angles
On the Photos tab, take a photo of each required angle: front, rear, left, and right. Tap an angle, then choose to take a photo with the camera. You can add optional angles too — roof, windshield, wheels, interior, trunk, engine bay, or other — when they help show the car's condition. The Submit button won't turn on until all four required angles are captured.
Damage: log anything that's already there
On the Damage tab, tag any existing marks before you wash — a scratch, dent, or chip. For each one, pick the category (what part), the condition, and the severity. This protects you so an old scratch isn't blamed on the wash.
Review: odometer, fuel & notes
On the Review tab, enter the odometer reading and the fuel level, add any notes you want on record, then tap Submit.
7Service checklist
When your shop enables it, a job comes with a Service Checklist — a list of tasks to work through so nothing gets missed. You'll see Service Checklist on the job page when one applies.
Open the checklist
On the job page, tap Service Checklist to see every item.
Work through each item
As you finish each task, mark it done. Done items show a check; items still to do show an empty circle, so you can always see what's left.
Add a photo where required
Some items need a photo as proof. For those, the app opens the camera when you mark them done — take the photo and it's attached automatically. You can back out cleanly if you tap one by mistake.
Finish, then complete the job
Once every item is done, head back to the job and tap Complete to wrap it up.
8Your earnings
The Earnings tab shows your earning history — your total and a list of every paid job, with times and amounts. You can also view your payout history from the menu.
View your earning history
Open the Earnings tab to see your total earning at the top, followed by a list of paid jobs. Each entry shows the customer, the address, the times, and the amount you earned.
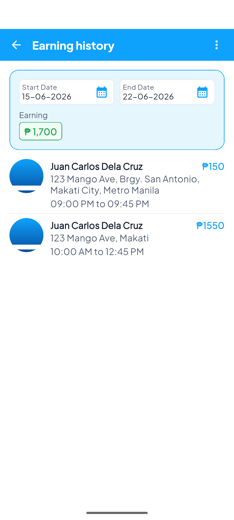
Filter by date range
Tap Start Date and End Date to view a specific period — a day, a week, or a pay cycle. The total updates to match the range you choose.
Check the details of each job
Tap into an entry to confirm the work behind each amount, so your earnings always match the jobs you did.
See your payouts
Open the side menu and tap My Compensation to view your pay setup and payout history — each payout shows the period it covers, the amount, and when it was paid.
9Messages
Stay in touch about your jobs from the Messages tab. Each active job has its own conversation so you and the customer (and your shop) are all on the same page.
Open Messages
Tap Messages in the bottom bar to see your conversations.
Read and reply
Tap a conversation to open it, read the latest messages, type your reply, and send. You can also open the chat for a specific job straight from its booking page.
Keep an eye on it during your shift
Check Messages while you work so you don't miss a question about a job — like where to park, or that the customer is running late.
10Your profile & settings
Manage your account from Settings in the bottom bar, and find Reviews and Compensation in the side menu.
Edit your profile
Open Settings → Edit Profile to update your details and profile photo. Save when you're done.
Change your password
From Edit Profile, use the change-password section: enter your current password and a new one, then save. (If you can't remember your current password, log out and use Forgot password instead — see Getting started.)
Verify your identity
Open Settings → Identity Verification to upload the documents your shop needs. Pick the document type, then Take Photo or Choose from Gallery to upload a clear photo of a government ID. Your status moves from Unverified to Pending Review while it's checked, then to Verified. If it's Rejected, you'll see the reason — just upload a new document to try again.
See your reviews & ratings
Open the side menu and tap Reviews to see the ratings and comments customers have left for your work.
Notifications & language
In Settings, turn Notifications on so new jobs and updates reach you, and tap Language to switch between English and Tagalog.
Log out
Open the side menu and tap Log out when your shift is done. Log back in next time with the same details.
11FAQ & troubleshooting
I'm not receiving any jobs.
First, check that your availability toggle says Online — you only get assigned work while you're online. Also make sure you have an internet connection and notifications turned on. If you're online and still get nothing, ask your shop owner whether jobs are being assigned to you.
I can't log in.
Worker accounts are created by your shop owner, not by you. Double-check you're using the exact email and password they gave you. If you've forgotten your password, use Forgot password on the login screen to reset it with a code. If it still won't work, ask your shop owner to check or reset your account.
How do I mark a job done?
Open the job, tap Start when you begin the wash, and tap Complete when you finish. A job only counts toward today's work and your earnings once it's marked completed. If the app asks for a before or after photo first, capture it and you'll be able to continue.
Where do I see what I earned?
Tap the Earnings tab. Your total is at the top, and each paid job is listed below with times and amounts. Use the Start Date and End Date filters to view a specific period. For payouts, open the side menu and tap My Compensation.
The customer isn't at the address.
On home / off-site jobs, use Call (or the job's chat under Messages) to reach the customer and confirm the location, and Directions to make sure you're at the right place. If you still can't reach them, report it so your shop has a record and can help (see More tools).
Why does a job ask me to take photos?
Some jobs use a vehicle intake — front, rear, left, and right photos plus a condition report — to keep a clear record of how the car looked before the wash. Complete the four required angles so you can submit; it protects you if there's ever a question about the job.
Why does a job have a checklist I have to finish?
When your shop enables it, a job comes with a Service Checklist so nothing gets missed. Mark each item done as you finish it, take a photo where one's required, then go back and tap Complete.
How long does identity verification take?
After you upload your document, your status shows Pending Review while it's checked, then changes to Verified. You'll be notified once it's reviewed. If it's Rejected, the screen shows the reason — upload a new, clear document to try again.
I accepted a job by mistake — what now?
Tell your shop owner as soon as you can through Messages so they can reassign it. The sooner you flag it, the easier it is to sort out before the customer is affected.
The app won't let me Start or Complete.
That usually means a required photo is missing. Capture the before photo before Start and the after photo before Complete, finish any required checklist items, and the button will work. If it still won't, check your internet connection and try again.
12More tools (appendix)
Depending on the job and how your shop is set up, you may see extra tools on a job page or in the side menu. Here's a quick line on each so you know what it's for:
- Report a safety incident — flag something unsafe (a hazard, a spill, an injury) so your shop has a record and can act.
- Report a job incident — log a problem on a specific job, such as damage or something unexpected, so it's on record early.
- PPE Checklist — a quick safety / protective-equipment check to run through before you start work.
- SDS Quick Reference — fast safety info for the cleaning chemicals you use, in case you need it on the spot.
- Mobile Kit (check-out / check-in) — for off-site dispatch: check out the tools and supplies you take with you, then check them back in when you return.
- My Tasks — your off-site task queue, with a "ready for pickup" action when a vehicle's done away from the shop.
- Fleet scan — scan a vehicle's QR code to pull up the right job quickly on fleet bookings.
- Service Add-ons (change orders) — propose extra services for the customer to approve when a car needs more than the original booking.
- Redo (warranty) requests — handle a job that needs to be redone under warranty.
- Disputes — flag or follow a disagreement about a job for your shop to review.
Get the OtoWash Worker app
Go online, take jobs, and get credited for every wash you complete.
Get the app